Wednesday, February 29, 2012

Green Eggs and Ham Cupcakes

We have a lot of love for Mr. Theodor Geisel in this family.
He is better known as the incomparable author, Dr. Seuss.


Our Dr. Seuss books are all well-loved and very well-worn.
I'm pretty sure that we own every children's story he ever wrote,
including "The Bippolo Seed". Have you heard of that one?

We even dressed as Dr. Seuss characters for Halloween 2010!


 I would say that "Green Eggs and Ham" is probably our favorite Seuss book.
My son has the whole book memorized and will quote from it at random times.
When we go out at night, he starts reciting, "Would you, could you, in the dark?"
and continues with the rest of the book!

We celebrate lots of extra birthdays around here, including Cookie Monster and Beethoven.
So, I made these cupcakes to celebrate Dr. Seuss' birthday on March 2.


Do you like green eggs and ham?
Would you, could you, like to make them?

You can print out my template for green eggs and ham cupcake toppers here.


For my tutorial on making candy melt decorations with a template, go here.
To make the thick, dark outline, I used Wilton tip #5 and
brown candy melts mixed with some black coloring gel.


I hope you enjoy these fun cupcakes!

Happy Birthday, Dr. Seuss!

I link up at these parties.

Thursday, February 23, 2012

Key Lime Shamrock Cake

I have lots of wonderful memories of the Florida Keys,
where the hubby and I spent our honeymoon.
Sunset on the beach, delicious food, swimming, snorkeling,
 when my husband lost his wedding ring in the ocean...


OK, so maybe that last one isn't a fond memory.

I do sometimes wonder whatever happened to that ring...
still buried in the sand?
 swallowed by a fish?
 found by another lucky tourist?


Speaking of the Florida Keys...
did you know key limes got their name because they are grown there?

They are a lot smaller than other limes, about the size of a walnut.
Squeezing a decent amount of juice out of these little guys takes a LOT of work.
So, this is how I make key lime juice easy...


Nellie & Joe's Famous Key West Lime Juice.
I buy it at my local grocery store, but am guessing it may be harder to find outside of Florida.
I have also seen it at World Market, if you have one near you.
(They are not paying me for this, I just love the stuff!)


Native Floridians (myself included) are adamant that Key lime desserts are NOT green!
So, I may get in some trouble for this cake.
But if Chicago can die their river green for St. Patrick's Day,
I can color my key lime cake green, too!

Key Lime Cake
adapted from The Cooks Next Door

  • 1 c. (2 sticks) unsalted butter, softened
  • 2 c. sugar
  • 4 eggs
  • 2 t. vanilla extract
  • 1 T. grated key lime zest
  • 1/4 c. key lime juice
  • 3 c. flour
  • 1 1/2 t. baking powder
  • 1/2 t. baking soda
  • 1/2 t. salt
  • 1 c. buttermilk (or 1 c. milk + 1 T. vinegar)
  • green food coloring (optional)
Preheat oven to 325 degrees. Line the bottom of your cake pans with wax paper, and grease the sides. (I used 6 inch round pans, but 8 or 9 inch would work too.)

In a large bowl, cream the butter and sugar until light and fluffy (about 3 minutes). Mixing at low speed, add the eggs one at a time. Add the vanilla, key lime juice and zest and mix well. In a separate bowl, combine the flour, baking powder, baking soda and salt. Alternately add the dry ingredients and the buttermilk to the batter, beginning and ending with the dry. Mix until well combined. Add food coloring and mix until combined.

Batter will be thick. Pour it into the pans and smooth the tops. Bake for 35-40 minutes until toothpick inserted in center comes out clean. Allow to cool on a rack.


Key Lime Cream Cheese Frosting

  • 1/2 c. unsalted butter, softened
  • 8 oz. cream cheese, softened
  • 2 T. key lime juice
  • 1 t. grated key lime zest
  • 6 c. confectioners' sugar
In a large bowl, cream butter and cream cheese until light and fluffy. Add key lime juice and zest, and mix well. Add the sugar a few cups at a time, and beat until fluffy.


If you like key lime pie, you are going to LOVE this cake!
It is the perfect combination of tart and sweet...Yum!!

Happy St. Patrick's Day!

I link up at these parties.


This post was featured!
TidyMom
The 36th AVENUE


Wednesday, February 15, 2012

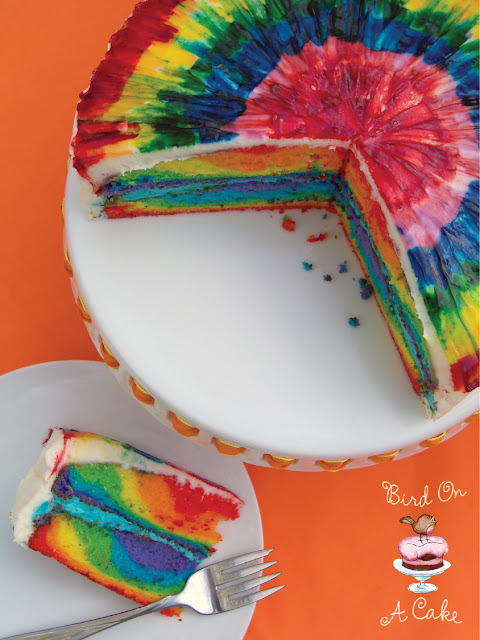
Rainbow Tie Dye Cake

Today I am sharing a cake that is guaranteed to brighten your day!
Look at all those beautiful RAINBOW colors...


This cake combines the awesomeness of tie dye and rainbows...
Doesn't it make you smile?

I used the cake coloring technique (not the recipe) found at Omnomicon.
I wanted the outside of my cake to be as colorful as the inside,
so I added my own tie dye design to the top.

Start by preparing a white cake mix.
Divide it into 6 bowls, and make each bowl a different rainbow color.


Line the bottom of two 9 inch cake pans with wax paper, and grease the sides.
Layer your cake batter in concentric circles.

Use about 3/4 of the bowl for your bottom color,
then use a little less of each color as you continue.
Layer your second cake pan in the opposite order.


Bake your cake as directed on the box.
Let the cake cool, then frost with your favorite white frosting.
(I put blue frosting in between the layers, just to add more color.)

Next, you need food coloring gel in your 6 rainbow colors.


Make concentric circles with the gel on the top of your cake.
( I started with red on the outside, and used it again when I got to the center.)


Time to make some cake art!
Using a small, flat paintbrush (new or only used for food),
start at the center circle and brush toward the outside of your cake.

You will need to stop and clean your brush a LOT!
Just wipe it on a paper towel.
Otherwise, the blue and green will overpower the other colors.

This is how I did it:
Red
Purple
Blue
(clean brush)
Green
(clean brush)
Yellow
Orange
Red
(clean brush)


Repeat the same process in the gaps between your "spokes".
Continue until all the white frosting is covered, and there aren't any gel blobs.
 

Want to see the inside?


Rainbow-licious!


Wishing you Peace, Love and Cake!
 Enjoy!

(I joined these link parties.)

This post was featured!
They are talking about me at CraftGossip.com{nifty button}TidyMom
kitchenfun

Wednesday, February 8, 2012

A Strawberry Cake Valentine

I have a Valentine for YOU!

This cake...


And this card...


It makes me SO happy that you come here to share my cake adventures with me!
I love hearing about your cake adventures too.
You guys make me smile! :0)

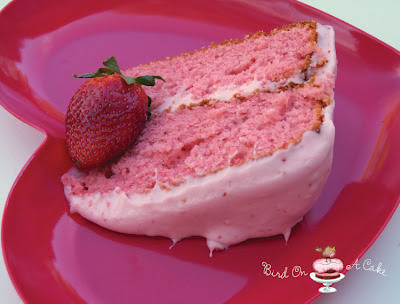
This is my Valentine's Day cake.
I make it for my family every year, and they love it!

It starts with a white cake mix...super easy!
Pureed strawberries and cream cheese make it delicious.
And I bake it in heart shaped pans to make it cute.


Strawberry Cake
  • 1 box white cake mix
  • 1 (3 oz.) box of strawberry instant gelatin
  • 1/2 cup pureed strawberries (frozen or fresh)
  • 1/2 cup water
  • 1/2 cup oil
  • 4 eggs
Preheat oven to 325 degrees. Line the bottom of 2 heart shaped cake pans with wax paper, and spray the sides with cooking oil.

In a large bowl, combine cake mix and gelatin. Add water and oil; mix on medium speed. Add eggs, one at a time, beating well. Add strawberries and beat until blended. Pour into pans and bake for approx. 25 minutes.


Strawberry Cream Cheese Frosting
  • 8 oz. cream cheese (softened)
  • 1/4 cup unsalted butter (softened)
  • 1/2 cup pureed strawberries (frozen or fresh)
  • 1 tsp. vanilla
  • 6 cups confectioners' sugar
In a large bowl, beat cream cheese and butter until creamy. Beat in strawberries and vanilla. Gradually add sugar, beating until smooth. Spread on cooled cake.

This frosting is very soft (and so yummy!), so expect your cake to be
gloriously messy!


Happy Valentine's Day!
 
I joined these link parties:
Somewhat Simple - Strut Your Stuff
A Turtle's Life For Me - Share & Wow Wednesday 
The 36th Avenue Link Party 
Mrs. Fox's Sweet Party 
Lady Behind the Curtain - Cast Party Wednesday 
Every Crafty Endeavor 
WhipperBerry - Friday Flair
Petals to Picots - I Heart Fridays 
Alli 'n Sons - Sweet Tooth Friday 
The Grant Life - Financial Friday 
30 Handmade Days - Pity Party 
Tidy Mom - I'm Lovin' It 
Food Corner - Decorating Challenge 
Delicately Constructed Friday 
Blissful & Domestic - Feature Friday 
Natural Nesters - Naturally Nifty Party 
Tatertots & Jello - Weekend Wrap Up
Family Ever After - Once Upon A Weekend 
Six Sisters' Stuff - Strut Your Stuff Saturday 
Sweet As Sugar Cookies - Sweets for a Saturday 
Nifty Thrifty Things - Nifty Thrifty Sunday 
I Heart Nap Time - Sundae Scoop Link Party
Craft-O-Maniac Monday Link Party 
The Blackberry Vine - Tuesday To Do Party 
Crazy for Crust - Crazy Sweet Tuesday 
Chef in Training - Tuesday Talent Show 
Skip to my Lou - Made by you Monday 

This post was featured!
Featured on Today’s Menu Round-upThe 36th AVENUE


Wednesday, February 1, 2012

R2D2 Star Wars Birthday Cake

Something very exciting and a little scary happened here last week...

My daughter became a teenager!

Gladly, she did not morph overnight into a self-absorbed, constantly texting drama queen.
But I really wasn't worried about that...

I sometimes think that God sent me the easy child first, so that I would have more children!
Our oldest child, Brynn, is unique and wonderful in so many ways.

Her loves are:
Star Wars,
sewing,
reading non-stop,
making origami animals,
and her two pet snakes.


For her birthday, she requested a cake with R2D2 on the top.

So, I made this buttercream transfer!
This decorating technique involves piping buttercream frosting on to a template,
then transferring it to your cake.


Cute little droid, isn't he?

Do you have a Star Wars fan in your family?
You can find my R2D2 template (made by my graphic designer hubby) here.


And my step-by-step tutorial on how to make a buttercream transfer is here


May the Force be with you!

I share my recipes and tutorials at these fun link parties.
 This post was featured!


Related Posts Plugin for WordPress, Blogger...