

Today I am sharing a cake that is guaranteed to brighten your day!
Look at all those beautiful RAINBOW colors...

This cake combines the awesomeness of tie dye and rainbows...
Doesn't it make you smile?
I used the cake coloring technique (not the recipe) found at Omnomicon.
I wanted the outside of my cake to be as colorful as the inside,
so I added my own tie dye design to the top.
so I added my own tie dye design to the top.
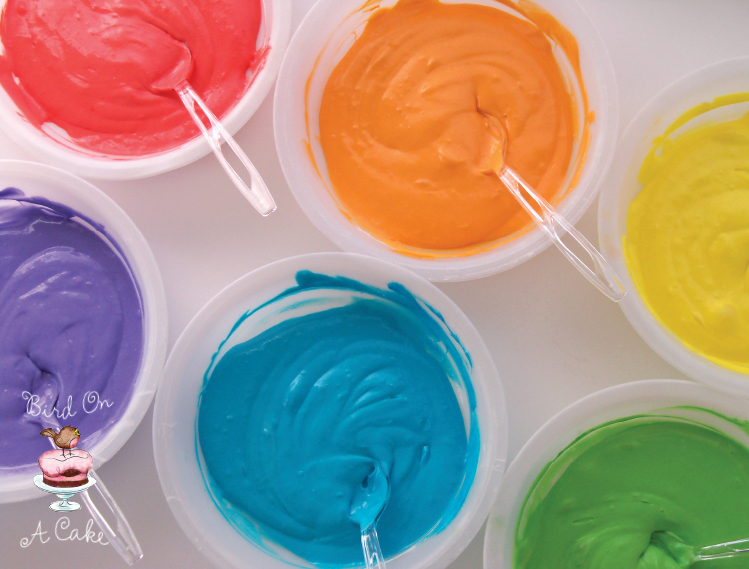
Start by preparing a white cake mix.
Divide it into 6 bowls, and make each bowl a different rainbow color.
Line the bottom of two 9 inch cake pans with wax paper, and grease the sides.
Layer your cake batter in concentric circles.
Use about 3/4 of the bowl for your bottom color,
then use a little less of each color as you continue.
Layer your second cake pan in the opposite order.


Bake your cake as directed on the box.
Let the cake cool, then frost with your favorite white frosting.
(I put blue frosting in between the layers, just to add more color.)
(I put blue frosting in between the layers, just to add more color.)

Make concentric circles with the gel on the top of your cake.
( I started with red on the outside, and used it again when I got to the center.)

Time to make some cake art!
Using a small, flat paintbrush (new or only used for food),
start at the center circle and brush toward the outside of your cake.
You will need to stop and clean your brush a LOT!
Just wipe it on a paper towel.
Otherwise, the blue and green will overpower the other colors.
This is how I did it:
Red
Purple
Blue
(clean brush)
Green
(clean brush)
Yellow
Orange
Red
(clean brush)

Repeat the same process in the gaps between your "spokes".
Continue until all the white frosting is covered, and there aren't any gel blobs.

Want to see the inside?

Rainbow-licious!

Wishing you Peace, Love and Cake!


That is just so awesome! Love it! Perfect for a kid's birthday :) I'd love for you to share with my readers if you get a chance: http://www.momontimeout.com/2012/02/taking-timeout-thursday-no17.html#more
ReplyDeleteThanks for sharing!
That is amazing! So beautiful. Makes me want to be back at my daughter's birthday party. :)
ReplyDeleteI love this cake! The way you did the tie dye on top looks so cool!
ReplyDeleteBrilliant! So gorgeous.
ReplyDeleteBeautiful cake!
ReplyDeleteThis is one of the prettiest cakes I've ever seen! Love it.
ReplyDeleteLoulou Downtown
Gorgeous! Pinned it! :)
ReplyDeleteso fun, I love how the frosting matches the inside!
ReplyDeleteWhat a wild cake!
ReplyDeleteIf you look at my blog and logo, you might understand why when I saw your name on another comment list I HAD to come see your blog! Love the picture on your header!
My daughter wants a rainbow cake for her birthday. Although I'll probably do fondant on the outside, I'm definitely doing this for the inside. Thanks!
ReplyDeleteWhat a gorgeous work of art! This is much better than the tye-dye shirts from the 80s. :p Much more delicious, any way! ;p Heidi Rew from PartiesforPennies.blogspot.com
ReplyDeleteI HAVE to try this! It looks beautiful and delicious!
ReplyDeleteWhat a fun, fun, fun cake... love it!
ReplyDeleteI wish you lived by me so you could make all my birthday cakes!! Super darling! Thank you for linking up to my weekly party!!
ReplyDeleteAmanda
everycreativeendeavor.com
How festive! Super cool! So glad that you linked this to Things I've Done Thursday~
ReplyDeletewww.bearrabbitbear.com
Saw you in Kitchen Fun with my 3 Sons...... Awesome!! We are going to give this a try. Great pictures and directions by the way!!!!
ReplyDeleteI love, love, love this! just pinned it.
ReplyDelete(found you at two linky parties today)
Kim www.plumberrypie.blogspot.com
when do you add the cakes together? doesn't say...
ReplyDeleteWhen the cake is cooled, you assemble the layers. Put frosting between the layers and cover the whole cake with frosting. THEN you make your cake art on top! Hope this answers your question. :0)
DeleteYou are so creative, this is an awesome looking cake. Thanks for sharing!
DeleteSorry, also if you used the same gel, how much do you use for the cake batter. I am obviously a novice.
DeleteThat is so awesome! I'm a sucker for tie dye.
ReplyDeleteI've always loved the rainbow cake and LOVE the tie dye top on this cake! Wonderful idea. Totally pinning this :)
ReplyDeletestunning!!! Your colors are so bold and bright! This cake looks amazing! I host a Tuesday link party. I hope you can stop by sometime and share this cake! http://nap-timecreations.blogspot.com
ReplyDeletehow fun is that!!!!!tfs!!!
ReplyDeleteI seriously love this cake. How fun!!
ReplyDeleteWow, that cake is insane! Just amazing.
ReplyDeleteWhat brand of food coloring did you use for the cake? I can never get mine that bright.
ReplyDeleteI used Wilton icing color gel. It gives much brighter colors than liquid!
DeleteDid you use the same Wilton gel to color the inside of the cake or is it a different gel coloring?
DeleteGroove cake! its so COOL!
ReplyDeleteYummy!! This looks delicious! Love how the rainbow looks!!
ReplyDeleteI don't think I'll ever tire of rainbow treats! Your icing technique is unique. It really does look like a tie-dye shirt:)
ReplyDeleteOh! What a cool idea! I'm definitely pinning this!
ReplyDeleteThis is just about the coolest thing I've seen in awhile!! LOVE LOVE LOVE it! TY!
ReplyDeleteWhat fun!!
ReplyDeleteThanks for linking up! I featured your post in my wrap up http://tidymom.net/2012/birthday-parties/
Have a great rest of the weekend!
Wow wow wow wow! BEAUTIFUL!!! I'd love to have you share this with our readers for our Fun Stuff Fridays link up! http://www.toysinthedryer.com/2012/02/fun-stuff-fridays-11.html
ReplyDeleteI love the idea for the tie dye on the top of the cake! Will have to try that! I am surprised and impressed at how vibrant the colors are. The cake looks terrific.
ReplyDeleteOMG!! I love this!! going to try it the next time I need to make a cake!!! Thanks for sharing!!
ReplyDeleteMy 4-yr old just requested this cake for her next birthday!
ReplyDeleteI love this very cute! The frosting make this amazing! Have a wonderful week!
ReplyDeleteThis is so awesome! Love this and love your blog!
ReplyDeleteFollowing (:
Fun,fun,fun cake......love it!
ReplyDeletePlease take off word verification.
ReplyDeleteThe tie dyed effect is fantastic! My 32 year old daughter will have her 8th real birthday on the 29th of February and this is perfect for her!! Thank you
ReplyDeleteAbsolutely LOVE this!!!
ReplyDeleteThis looks amazing!! Thanks for joining us on our "Strut Your Stuff Saturday." We hope you come back next Saturday. We would love to have you share more wonderful ideas and recipes! -The Sisters
ReplyDeleteHow fun - just what we need to add a bit of color to our long winter. Love it, thanks so much.
ReplyDeleteThese are amazing! If you are looking for Tye Dye Hair Bands then give us a call!
ReplyDeleteAnother fabulous cake Robin!! Thanks for linking up. You'll be featured on my Pity Party tomorrow. xoxo
ReplyDeleteJust stunning! LOVE your creativity ~ :-)
ReplyDeletexo
Pat
Awesome cake! I've been looking for something to brighten up the kids' day - it's so brown outside while we wait for spring, this is the perfect pick-me-up!
ReplyDeleteIncredible! My son is having a birthday party this weekend and I'm going to try this out! I'm sure it will be the hit. Thanks so much for sharing the tutorial. So many times I see awesome cakes and have no idea how to create them. Thank you again.
ReplyDeletewww.LittlestSweetPea.com
Esta hermoso tu blog! Probare tus recetas.saludos dede Veracruz, mexico
ReplyDeleteI made this for my son's 12th birthday (I decorated it so that it looked like paint splats for a paintball party) and it was FANTASTIC! Thank you. I had to come out of lurking to tell you that :-) Next week is your Key Lime cake!
ReplyDeleteWonderful!! The paint splats are a great idea! Thanks so much for sharing. :0) You are going to love the Key Lime cake...so yummy!
DeleteSo did you use 2 cake mixes, or just one to make the two 9 inch cakes? I'm going to make this for my son's 4th birthday. It's beautiful and looks so fun!!
ReplyDeleteI used one cake mix for a 2 layer, 9 inch cake. I hope your son loves his birthday cake! :0)
Deletedid you use a can of white frosting rather than the cool whip and jell-o recipe on Omnomicon?
ReplyDeleteI just wanted to let you know that we made this cake this weekend for my son's birthday party. It turned out perfect! I wrote up a blog entry and included the link back to your blog. Thank you so much for sharing.
ReplyDeletehttp://www.littlestsweetpea.com/2012/03/scrumpdidliumptious.html
did you use the soda recipe or just follow the directions on the back of the cake mix, seperate, and put in colors??
ReplyDeleteI did not use the omnomicon recipe, just her coloring technique. Follow the directions for your cake mix. :0)
Deletei didn't get to frost my rainbow cake, my three year old wanted it so badly, we had a rainbow cake party with pomagranite juice! it really is wonderful warm. i used the white velvet cake recipe from the cake bible and liquid food colours and the layers are perfect! (well, they are mostly gone now!)
ReplyDeleteI LOVE the outside of this cake [well the inside too of course :)]! It's just great!
ReplyDeletewww.mycakecorner.blogspot.com
Do you have a good cake recipe that you can share?
ReplyDeleteWhat kind/brand of frosting did you end up using for this?
ReplyDeleteI made cream cheese frosting. Here is my recipe:
Delete8 oz. cream cheese (softened)
1/2 cup unsalted butter (softened)
6 cups powdered sugar
1 t. vanilla
Beat the cream cheese and butter together. Gradually add the powdered sugar. Mix in the vanilla.
Do you think it would work as good with a sheet cake?
ReplyDeleteHi it looks great I wanna try to make this, did you use double receipt
ReplyDeleteMy to be 19 year old sent me a picture of your cake saying, "If I get this for my birthday I will need nothing else" No link just a picture....after looking at every tiedye cake recipe, I FOUND YOU!!! yours is definetly the best one out there!!! Thank you so much for sharing it!!!!!
ReplyDeleteThis is so cool!! Or, as we said in the sixties, "bitchen" - it would go great with my Hippie Happy Hour Martinis!
ReplyDeleteI can't wait to do this with my daughter. What a great activity! =D
ReplyDeleteI just made this for Easter and it was a huge hit and delicious! Thanks for sharing:)
ReplyDeleteYou are so welcome! I'm glad that everyone enjoyed it! :0)
DeleteMy mom and I made this for my daughter's 10th birthday party. It was so pretty and was a big hit! I've already been asked for the directions to make the cake!
ReplyDeleteFound it on Pinterest. It looks like you have more great cake ideas! Can't wait to try them!! I am so glad I found you!!!:) Keep up the great cake making/designing/decorating!!!
Thanks so much, Nina! I'm happy to hear that your cake turned out well...and I'm glad you found me too! :0)
DeleteHas anyone tried the recipie for cupcakes?
ReplyDeleteYes, my friend made them into cupcakes and they were just as fantastic !! The kids flipped for these :) Use the same method - just drop by spoon fulls or pipe into your cupcake liners - each colored layer. Bake as normal, frost and enjoy !!
DeleteThis is just beautiful! Question... did you use 2 boxes of cake mix like Omnomicon mentions?
ReplyDeleteThanks, Jennifer! :0) I used one box of cake mix.
DeleteReally like this, have a grandaughter who would love it!
ReplyDeleteOh my goodness, this is darling Robin! I LOVE tie dye and have already shared your link with my family on Facebook. It's a few months away so they have plenty of time to practice. Ha ha! Thanks for the step-by-step!
ReplyDeleteDoes the gel food coloring change the taste? Or how does it taste? What do you recommend for frosting? I am going to try this for my daughter's 1st birthday party! I think she will love it!
ReplyDeleteI didn't detect any change in the taste. You actually end up wiping a lot of the food coloring gel off the cake, as you use the brush. I used cream cheese frosting, my fave! Here is a basic recipe: 1 stick unsalted butter, 1 8 oz. package cream cheese, 6 cups of powdered sugar, 1 teaspoon vanilla. Cream the butter and cream cheese (both at room temperature), gradually mix in the sugar, then vanilla. Enjoy!
DeleteHi! I know you said how to make the frosting, but how many regular sized icing containers (like Betty Crocker style) do you think it takes to cover the cake?? Thanks SO much! I am making this for my high school drama banquet!
ReplyDeleteI'm sorry I didn't reply sooner...I hope I'm not too late! For a two layer cake like this, one container of frosting should be sufficient. Have fun at the banquet! :0)
DeleteI made this last weekend for my son's 7th birthday. OMG was it AMAZING!! The frosting was delicious, though I only added 2 1/2 C of powdered sugar. My inside didn't look quite like yours... I sort of spread each layer of color out and I think that was wrong. How did you do yours? Just put a "blob" of one color followed by a "blob" of another?
ReplyDeleteI'm so glad you enjoyed the cake! If you look at the third photo, you will see that I layered my batter in concentric circles. I also did the second pan in the opposite color order. Both of these things help to make the pattern inside.
DeleteMy daughter graduates from nursing school next week. She love's anything tie dyed. I have a feeling she's gonna love he grduation cake.
ReplyDeleteCongratulations to your daughter! I hope she loves the cake! :0)
Deletehow funny... i'm graduating from nursing school and making this for my "nurse rainbow" party. nice to know there is another hippy rainbow tie dye nurse out there!!!
Deleteamazing!
ReplyDeleteI made this today for my daughter's birthday, I used the red as my center though and colored my center frosting red, with strawberries in the middle. It looks wonderful! Can;t wait to see what everyone thinks :)
ReplyDeleteThat sounds fantastic! I bet everyone loved it! :0)
DeleteRobin,
ReplyDeleteWhen you put the batter in the pan, did you "sift" the pans around at all to distribute the batter to the edges or did you just leave it all in the middle and let the baking process even it out?
Thanks!
I love this cake so much ! We are having our son's 9th birthday party this weekend at an art studio so it will fit in perfectly. The most challenging part for me was figuring out the different quantities for each color but now I have them for next time because I'm sure one of the kids will request this cake again. Thanks for the wonderful inspiration !
ReplyDeleteI am going to make this for a party at our synagogue! Its just too gorgeous! I think I will try to use regular frosting, divide it up and put food colouring in it, because I am not sure that those gel frostings are kosher.....
ReplyDeleteMy soon-to-be 7 year old daughter has requested a hippie dippy tie dye party -- we were both THRILLED to find your cake! It is a funktastic work of art. I can't wait to try making one myself.
ReplyDeleteThis cake is fun and gorgeous and I can't wait to make it for my daughter's birthday in late July. Might have to make a red, white & blue version for our July 4th party! Thank you!
ReplyDeleteTo get the different colors of frosting, do you just add food coloring to white frosting? I've never seen those shades of frosting before so I'm curious as to how you got them. Thanks!
ReplyDeleteThe colors are simply mind blowing. I'm gonna make this cake for my family this weekend.
ReplyDeleteManual lathe
ok i am not not much of a cook but this looks so awesome! my kids want it...but why is the sprite necesary instead of following the cake directions? i dont get you use sprite. please email me at meeksjessica32@yahoo.com.
ReplyDeletethis is so easy to understand great job ...... i ALWAYS mess up on cakes like these but the way you said how to do it I finally got it thanks so much,
ReplyDeleteemma
Would you mind sharing what you used for the frosting? It looks like a nice fluffy icing and I would love the recipe. Thanks!
ReplyDeleteI have a question on the concentric circles - when you were making the first layer and 3/4 of the red cake mix was used first, did you spread the red across the entire bottom of the cake pan and then use the orange to make a smaller circle on the inside of the red or did you just make a ring with red around the outside edge and then add an orange ring inside that? Does my question make sense?
ReplyDeleteI made a circle of red batter (it did not go all the way to the edge of the pan), then a smaller circle of orange on top of the red, then each circle of color a little smaller after that. NOT rings. I hope this helps! :0)
DeleteGreat - thanks for your help!
DeleteThis comment has been removed by the author.
ReplyDeleteThis cake is amazing. The color make this full of fun.
ReplyDeleteWhat brand cake mix did u use ?
ReplyDeleteI always use Duncan Hines. It turned out great! This might be a little late though.
DeleteThis is simply FANTASTIC. and I believe I will try with a cupcake version...Cheers and thanks for inspiring me—
ReplyDeleteSo I made this for my Son's birthday party back in April. It was a hit!! It was such a hit in fact my niece has requested I make it for her birthday which is today. Cakes are in the oven right now. Thank you so much for the fabulous post.
ReplyDeleteNeed this cake for send gifts to pakistan but it is not possible i think :-(
ReplyDeleteSo this on pinterest and we r doing it today because my little boys wanted to.
ReplyDeleteThanks for the directions!!! can't wait to make it!
ReplyDeleteI just made this cake this past weekend for my friend's 27th birthday (picnic at the park) and it was a HIT! So much easier than I thought, it would be. I also used regular Betty Crocker White Cake Mix and Vanilla buttercream frosting and it turned out very bright and tasty with those gel colors! I tell ya, gel colors from now on! My next rainbow extravaganza are going to be pancakes!
ReplyDeleteThis is such a great idea. My daughter's 11th birthday party is this Sunday and we'll be tie-dying t-shirts. I think the kids (and adults) will go wild when they see that there's a cake to match.
ReplyDeleteThis is excellent post. I really appreciate for this great idea. This cakes looks so colorful and delicious. Great job. Thanks for share.
ReplyDeleteFAR OUT! MY DAUGHTERS WILL LOVE THIS BLAST FROM MY PAST. THANK YOU. ANNMARIE
ReplyDeleteAWESOME!! We just made this cake for my friend's (who is pretty psychedelic) going away party! It turned out great!
ReplyDeleteThe only thing that I couldn't find though was the colour gel.. So I just used food colouring! It turned out great.. a bit tricky for the icing part.. but it still looks groovy! -- Thanks!
Lish and Dharm <3
Did u colour the icing and use to create the tie and dye effect?
DeleteI am going to attempt to do this with cupcakes! Won't be putting two together though. Let's hope
ReplyDeleteIt turns out alright! Thanks for this recipe!
I've done this with cupcakes its awesome too and I the dyed the icing it was great...
DeleteThis cake is so cool I have never seen one like it! Looks like so much fun to make and it would be great for a kids party!
ReplyDeleteAwesome cake ! Im gonna try this!
ReplyDeleteI'm making this cake a bit differently. Instead off the forward and backward colors in the two pans, I've done three colors in one pan and three colors in the other pan. When I put the cake together the colors will run (top of cake) red to (bottom of cake) purple. I can't wait for it to be able to cut it and show my friends!
ReplyDeleteGood thinking that's a great idea I'm going to try that next time I would like to see a picture of it cut..
DeleteThis cake is awesome,I'm making it for a girl who is turning 21 and I'm putting a martini glass in the middle and instead of olives on a toothpick I'm going to do the #'s 21 in the glass...I'm excited I think it will turn out great!!!!
ReplyDeletecan i use Yellow cake? will it affect the color a whole lot? Im just not a fan of 'white cake" .. thoughts?
ReplyDeleteI have to make this cake, it is so me! I still wear tye dyed shirts all the time, I have about a dozen or so. (yes I am stuck in my child hood) It is just beautiful and I hope mine looks half as good as yours when I am finished! Thanks so much for showing me how to create such a wonderful cake!!!
ReplyDeleteI made this for a bridal shower (the bride is a huge fan of the dye) and it was a huge hit. Thanks for helping me get a ton of compliments. :)
ReplyDeleteQuestion: Does the gel food coloring make the cake taste ooky? I had a red frosted cake at party recently and all I could taste was chemicals!
ReplyDeleteI would love to make this, but I'm wary... you know?
I just saw your comment, sorry it took a while to respond! I did not notice a taste from the gel. You brush a lot of it off with your paintbrush while making the design.
DeleteA gifts for girls watch is a pride to own. The Michele rose gold women's watch is a rose gold plated swiss rolex which conveys a light essence of luxury and elegance. This watch is a casual catier love that looks good on any occasions. The watch is characterized by a rose gold plated waterproof jacketsstainless steel bracelet and case and shows youthfulness to the fullest. The mature elegance Plus Size Dresses of rose gold is shown with the rose gold colored bezel. The dial is made up of white colored enamel and the watch is equipped with omega watches for women luminous hands for enhancing the legibility in dark rooms. The dial has hour markers and minute markers on the outer edge and cheap miu miu handbags
ReplyDeleteDo you use 1 or 2 boxes of cake mix? I used only 1 and it seemed like not enough. Also, how exactly do you do the icing? I tried it but the icing kept sinking in (used a flat brush). The colors didn;t brush out like yours. Any suggestions?
ReplyDeleteThis is beautiful! Thanks for sharing!
ReplyDeleteRadhika
Please remember that food dye can be harmful to your health. It may not be a good idea to feed your kids large quantities of it.
ReplyDeleteMore info: http://www.thedailygreen.com/healthy-eating/eat-safe/artificial-food-colorings-health-effects
DeleteI really, really loved this when my friend and I found it the other day. So we tried REALLY hard to do it too tonight...but it didn't turn out lol It was still fun to make!! Here's our AWFUL finish XD: http://captainmugi.tumblr.com/post/42992067682/im-mad-guy-the-cake-didnt-turn-out-how-it-was
ReplyDeleteI cannot get over how amazing this is! So need to try it! I'm starting up a cake page and would appreciate some support if anyone wants to like me on facebook :) www.facebook.com/lidscakes
ReplyDeleteThis is incredible! You're a genius. There is no way I'm going through my life without making one of these.
ReplyDeleteI love this cake! Its so pretty!! =)
ReplyDeletePinning to save. =)
wow this is good i love it
ReplyDeleteMy granddaughter loves rainbows. She'll eat this up! :D
ReplyDeleteI made this today for my son's 3rd Birthday and it was a HIT!!! Everyone loved it and it looked SO cool! I ended up not doing the colors on top but just using your cream cheese frosting recipe (which was to die for) and putting colored sprinkles on the top. Thanks for sharing this! Such an easy recipe for a really fun & different cake!
ReplyDeleteBest,
Jen @ YummyHealthyEasy.blogspot.com
I absolutely love this cake! I made it for my little sister's birthday and she and her friends loved it! I made one little adjustment, for the sides I sprayed blue wilton color mist(that was the color on the outside of the tye-dye) and it really made the other colors pop! It was a really fast and easy recipe and the cake looked great!
ReplyDeleteKeep up the great work, Kelly
http://fotrcakes.blogspot.com/
I just totally FAILED this cake...dont see anywhere to post a pic or I would! Uggghhh thank goodness I only to try to be creative with family!!
ReplyDeleteWhen putting the cake mixes in the pan do the colours not run together? How do you get the mix to stay in a circle and not run together?
ReplyDeleteI might try this one, its a brilliant idea! I have not tried a rainbow cake yet! It's something I will have to get onto. This cake makes me feel so hungry! Xxx
ReplyDeleteI just made this and its beautiful!! Had a 12in square and a 8in round tie died the top of both and my mom loved it! (For her birthday) must try u will not be disappointed.
ReplyDeleteWow!! I love this!! You did an excellent job! I can't wait to try it for my daughter's birthday!
ReplyDeleteCute:)
ReplyDeleteHi all - can I use the Wilton color gel and do the design over fondant? Please help!
ReplyDeleteNow that's what I call playing with your food.
ReplyDeleteWhat size paintbrush do you use for the cake art?
ReplyDeleteBeautiful design I am going to try this for Mother's Day.
ReplyDeleteThis could not be more perfect for us baby-boomers! Thanks SO much.
ReplyDeleteThanks so much can't wait to try it! Nice to see a website that actually makes what it's picture impliea it does lol!
ReplyDelete